Thursday, April 29, 2010

Block Websites based on Categories with K9 Web Protection

Hello Readers:
Internet is the best source of knowledge and information now a days. It has its merits and demerits. Most of the youngsters start browsing the internet for knowledge and are diverted to illegal content containing nudity, vulgarity, and disgraceful content. For this reason Free Software Advisor bring you a freeware to block such web contents. 

K9 web protection is a product of Blue Coat. Blue coat uses unique web filtering technology for filtering the Internet. It divides the content into different categories and stores in their database. K9 web protection is among the best Internet Filters available. It protects you and your family from visiting certain websites based on the categories you have chosen. This is totally free software. In the setup tab you will find more than 60++ categories are available to block website related to that categories. So you have a greater control over blocking sites to a particular topic like porn site, illegal sites etc.

Using K9 Web Protection
1:  First of all you need to download this K9 web Protection freeware
2:  During the installation process you'll be asked to enter the license key. Get your Free License key.
  Once You Entered the License Key you'll be asked to specify your security password. This password will be required to switch on/off or edit the settings of the web protection.

  1. Software is very small in size (620 kb).
  2. No need to update database.
  3. Easy to use and it’s free.
  4. It won’t take much cpu memory.
  5. It records the Internet Activity (records the URL that we visited and stored in appropriate categories ).
  6. Password protected application.
  7. We can also provide the website url for exception.
  8. We can restrict based on time too using Time Restrictions option.
  9. It won’t  slow down our Internet speed.
Screen Shot :

Caution:
K9 Web Protection freeware also blocks some of the good websites, so you can't only rely on its default settings. You'll have to apply settings according to your requirements.

Wednesday, April 28, 2010

ShutDown/Restart Computers Without Moving to Start Menu

Hello Readers:
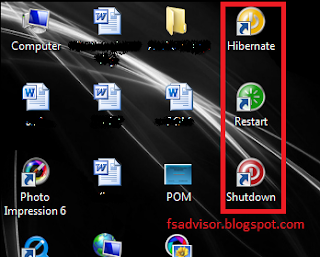
All the computer systems have this built-in ability to shutdown or restart your system. But have shutdown button right on the desktop looks more cool and easy way to restart/shutdown your computer systems.

Free Software Advisor brings you a powerful tool from SD Software named POWERLINK. This is a free small and useful utility that will place three shortcut buttons right on your desktop.

For Windows 7 / Vista 


Windows 7 users don't need to install a third party software for this task. Microsoft provides an official Gadget for it Windows 7 users. Using this Windows 7 users can easily Shutdown/Restart/Hibernate their computer systems right from their desktops.

Tuesday, April 27, 2010

Change Windows Start Button Easily

Sunday, April 25, 2010

Import E-mails from multiple ID's to your Gmail Account

Hello Readers:
Most of you are have multiple e-mail accounts including G-mail, Hotmail, yahoo etc....Its difficult to chek all of these inboxes daily therefore Free Software Advisor brings a solution for this problem. You can check/ and send your e-mails of all ID's within one platform, instead of checking all of these individually. 

You can easily import emails from any email Id to your G-mail Account. It is a very small and simple tips to follow. 

Importing E-mails to G-Mail
Sign-in to you Gmail account and click on the settings tab shown in the right upper corner of your G-mail account page as shown in the image below

Now click on the Accounts and Import tab and then click on the Import e-mails and contacts button
Settings > Accounts and Import > Import E-mails and contacts


Enter you email id and password of your account from where you want to import you emails and contacts


Choose the import options from the given as shown in the image below and click start import


Click Ok to finish the Import settings
You are done with the import settings.
Now if you want to reply to e-mail from the same address to which e-mail was sent to select the option
Reply from the same address the message was sent to 


Turn an Ordinary Mouse into Laser Pointer During Presentations

Hello Readers:
Microsoft Office 2010 is the latest release of Microsoft for the word processing. It has many useful options to make your documents, presentations more attractive and useful. Most of the presenters use a wireless laser pointer during their presentations to quickly point out the important points of their presentations.
Wireless mice is also a useful tool to change slides from a distance. Most of the wireless mice has a built-in laser pointer to point out the important points. Both of these options are very costly and every one is unable to afford any of these options.
Free Software Advisor platform brings a handy and a very simple tip for you to Turn your simple/ordinary mouse pointer into a laser pointer.

Turn Ordinary Mouse Pointer into Laser Pointer
Power Point 2010 provides its users to turn an ordinary mouse pointer into a cool looking Laser Pointer during their presentations. You need to launch your power point presentation in Microsoft Power Point 2010. Now start the Slide Show and press CTRL key and Press the Left Mouse Button (CTRL+LEFT Mouse Button)
You'll find this trick extremely handy and useful.
You Can Look at the Demo Below

Saturday, April 24, 2010

Facebook Violating Security of Personal Information

Hello Readers:
Security of your personal information is the most concerned and most sensitive issue while using the social networking websites. Most of us like to hide our personal Information.
But FACEBOOK is at it again...violating your personal information: As of today, there is a new privacy setting called "Instant Personalization" that shares data with non-facebook websites and it is automatically set to "Allow." Even if you don't want to share your personal information you are sharing it. To disable and secure your personal Information Go to


Account > Privacy Settings > Applications and Websites > Instant Personalization
and uncheck "Allow", not to share your personal Information with Non Facebook websites.

Thursday, April 22, 2010

Extract Audio from any Video File: Pazera Audio Extractor "Free"

Hello Readers:

Sometimes it happens that we have a video song and we need to extract only the audio out of it, but we find no way to perform this task. Today Free Software Advisor platform will provide you with a software name Pazera Free Audio Extractor. 

The main feature of this software is, it extracts audio files out of videos with great quality and no sound distortions. Many of the audio extractors are available on internet. But most of them are not free, softwares that are free don,t provide you the best quality audio file. A part from excellent quality audio extraction Pazera Free Audio Extractor converts the audio files to MP3, AAC, AC3, WMA, FLAC, OGG or WAV format.

Monday, April 19, 2010

Add "TWEET" Button to your Blog Posts with tweet counter.

Whenever we want to share any article to others, Twitter comes to our mind, because its the mostly used network for socialization. It one of the top most internet utilities of social networking.

Free Software Advisor is a free platform to provide you the tips for your blog/website improvements. If you want your article/post or any other content to be shared among the internet users of the world, Twitter tweets are one of the best solution for this purpose. Today at Free Software Advisor you'll learn how you can add a Tweet button on your blog. 
Tweetmeme not only provides an option to be shared on twitter via Tweets, but it also displays the number of tweets an article has got.
Adding Tweet Button To your blog
1:  Sign in to your Blogger Account and then go to Layout > Edit html
2:  Check the check box Expand Widget Templates
3:  Press CTRL+F and search for the following code

<p><data:post.body/></p>

4:  Just above this (<p><data:post.body/></p>) paste the following code
<div style="float: right;">
<script type="text/javascript">
tweetmeme_source = 'YOUR-TWITTER-USERNAME';
</script>
<script type="text/javascript" src="http://tweetmeme.com/i/scripts/button.js"></script>
</div>

5:  Now replace the text"YOUR-TWITTER-USERNAME" with your own twitter user name.
 and Click save changes.
ENJOY!

Saturday, April 17, 2010

Repair Your Corrupted Memory Card

Hello Readers: 
Now a days Memory cards are being used every where from you mobile phones to digital cameras. Sometimes it happens that the memory card you are using gets corrupted and you may loses your important data and images of your precious moments, and even you card may be fully gone, unable to be used any more. At that time you may plan to purchase a new one. But today Free Software Advisor platform gives you another option to repair your corrupted Memory Cards.  Using MMC Medic you can repair your Corrupted Memory Cards


Download | Memory Card Repair

Friday, April 16, 2010

Twitter "Follow Us": Add Floating Button to your Blog

Hello Readers:

Twitter is one of the most successful and emerging Social Networking Media now a days. Using twitter as a communication channel you can easily attract more traffic to your blog/website. Twitter Follow us Badge makes other to follow your tweet account. Using the code below Twitter Badge can be installed to almost all the blogs/websites.

Installing Twitter "Follow us" button to Blogs/Websites.
1:  Goto  HTML code of your website (For Blogger blogs Layout>Edit html)
2:   The find the code <body>
3:   copy the Code shown below and paste it just below the <body> tag


<a href='http://www.twitter.com/YOUR-TWITTER_USERNAME-HERE' style='display:scroll;position:fixed;bottom:200px;left:1px;' target='_blank'><img src='http://i46.tinypic.com/bj93dt.jpg' style='border:0;'/></a>

Replace the Golden Color code with your twitter user name and green color link with the "Twitter Follow Us" button of your own choice.
4:   Now save the template and enjoy the twitter floating follow us button on your Website/blog

Add a Floating "Back to Top" button to your blog

 Hello Reader:
Welcome Back to Free Software Platform. Whenever after scrolling down to long deep pages, user wants to get back to top of the pager users have to click on the scroll bar located at the right side of the browser, but it's very annoying in case of long pagers. Today at this platform you'll learn How to Add a floating "Back To Top" button to your website or blog. This button will keep on floating on your page and users will find it easy to go back to top of the page by just clicking that button once.

Note: Do take backup of your template before you try this. 

Go to Layout > Edit HTML, click on Expand Widget Templates and add the below code before </head>:
<a style="display:scroll;position:fixed;bottom:5px;right:5px;" href="#" title="Back to Top"><img src="http://i.imgur.com/yttem.gif"/></a>

If you want to use any customized image then just replace the red color cod with the URL of your favorite image.
Now save your template and you are done.  

Wednesday, April 14, 2010

Download Windows 7 Theme: NASA "The Hidden Universe"

Hello Readers:
Today Free Software Advisor brings you another beautiful and amazing Official Windows Theme pack for your desktops.
Bring the Hidden Universe Images to your Desktop. This theme consists of the images taken by the telescopes of NASA, providing you a great view of stars, Nebula and galaxies. Bring universe filled with kaleidoscopic colors blazes across your desktop in this theme for Windows 7.
 This theme consists of 14 unique images of the Universe. All these images are directly brought to your desktop through the powerful telescopes of NASA. This is an official theme pack for Windows 7, released by Microsoft. It can be downloaded from here...
You also can Use these awesome wallpapers only. If you only want to get the Wallpapers of the theme pack. 

Monday, April 12, 2010

convet Windows Desktop into multi desktops as of ubuntu - Linux

As the processesing power of today's computers is increasing day by day, so the ability to multiple tasks on the same time like listening music, image editing, web browsing, preparing a project presentation. But in the case of Windows this is very messy because of a single desktop. But Ubuntu provides us with a multiple desktop option we can perform our tasks without any mess. We can easily switch from one to another.
Today at platform of Free Software Advisor you'll learn that you can do the same with Windows.
Convert Windows Desktop into Linux like multiple Desktops 
The above shown image is the multiple Desktop example of the Ubuntu, which by default provides you with the Multiple Desktop Option. 
But Windows Operating System provides us with a single Desktop option by default. Thus working in Windows OS on many windows becomes messy and confusing. Here is a good news for Windows OS users that Virtual Desktop Manager is a small application that allows the Windows Vist/Xp users to work on the multiple Desktops. 
The great thing about the Virtual Desktop Manager is that, it provides the minimum 1 desktop to Maximum 100 Desktops. Switching between the Multiple Desktops is vry easy task. You can even the change hotkeys according to your ease.
Enjoy! Download Free | Vista/Xp Desktop Manager

Sunday, April 11, 2010

Customize Windows 7 Log-On Background

Hello Readers:
Free Software Advisor is a platform for free software, tips and tutorials. Today Free Software Advisor brings another Tweak Software for your Windows 7 Log-On Screens. Using this awesome tweak you will be enable to change the Log-On Screen Background of your Windows 7 Operating System.
This Log-On tweak is the powerful utility which changes the Log-On screen within seconds.  
The Windows 7 Logon Background Changer is a free software and it requires no installation. Just Download the rar file. Extract the files and open the extracted folder and click on the TweaksLogon. 
 Using this Log-On Changer is very easy. The interface of this software is very friendly.

Run "Logon tweak" application and select the "Change Logon Screen” . 
You can test logon screen by selecting “Test” without Log off your system
You can revert your Logon Screen to Default by selecting “Revert to default logon Screen”.

Click Here to Download Win 7 Log-On Background Changer
Or Visit Here to Get Windows 7 Log-on Tweak 

You might also like to Download Windows 7 Logon Background Changer

Open Applications; Minimized

It can be annoying when opening an application and having to re-size or maximize the screen. This can be especially annoying when you want to see all of the data in an app like Access or Excel.
To fix it all you need to do is create a shortcut of the application and then
right-click >Properties.
Under the Shortcut tab change the drop-down next to Run to Maximized. as shown in the image below

Saturday, April 10, 2010

Windows 7 Logon Background Changer

Everyone likes to customize Windows interface with respect to his/her taste. To at Free Software Advisor platform you'll have a look at a new and awesome free of cost software. That will allow you to change the Log-On Background of your Windows 7 OS.

Windows 7 Logon Background Changer is a free open source software that let you change the wallpaper of the Windows 7 logon screen (also known as "welcome screen", "login screen" or LogonUI). The Windows 7 Logon Background Changer is a free software and it requires no installation. Just Download the rar file. Extract the files and open the extracted folder and click on the Windows 7 Log-on background changer. 

You can even run this application from any USB drive or any other data storage source.

 To choose your favorite images you can click on the tab in right upper corner "choose the folder" as shown in the image.

After you have selected you favorite background, Click on the Apply button.

Download | Windows 7 Log-On Wallpaper Changer


Download Bing's Best 2 Theme Pack for Windows 7

Microsoft Windows 7 is the most popular and latest Operating System created by Microsoft. Microsoft is regularly updating its theme gallery with latest themes for the Windows 7. Microsoft recently has added one more theme pack to its gallery. Bing's Best 2 is the latest and awesome addition to it. 
  The popular Bing's Best 2 theme pack takes your Windows 7 desktop on a world trip from  the jagged peaks of the Andes in South America to Arizona's Vermilion Cliffs

You might also like to download these beautiful themes:
Official Samsung theme pack
Year of the tiger theme pack

Valentine Theme Pack 
 

Wednesday, April 7, 2010

Create Auto Table of Contents in MS-Word 2007/2010


Microsoft Office! one of the most used Word Processesing Suite in technology world. It allows you to create, manage your word processesing work more easily. It automates you each and every work of yours. Today at Free Software Advisor you'll learn: 
How To Create A table of Contents in MS-Word 2007/2010.
Yes! Microsoft Word gives us the option to automatically create the table of contents of our documents, books, research papers etc... created in Microsoft Word. Here Free Software Advisor will tell you the steps to create auto Table of Contents for your documents etc...
How to Create Auto Table of Contents in MS-Word...
Here I have created a sample document to teach you, How to create an automatic table of contents for your lengthy documents.
Step 1:
Prepare you own document in Microsoft Word.
Step 2:
 Now click on the red highlighted box (style arrow) to open the styles window.

Step 3:
Now assign the styles to your content. Give heading, subheadings styles to your text, as shown in the image below.

.................................................
..........................................................................

Step 4:
Now click on References tab and then click on the table of contents tab


Now right click on the Automatic Table of Content and select the suitable option where you want to put the table of contents. Usually it is always added at the beginning of the table.


Your Auto table of content is added to the beginning of your document.
 
Step 5:
If you already have added the page numbers to your document, then you can skip this step if you don't have added page numbers follow the following step shown in the image. 

Tuesday, April 6, 2010

MS-Excel: Change Columns to Rows Easily in few Mouse Clicks

Hello Reader:

Welcome again to Free Software Advisor. Some time it happens that we are working on some research or any tabular data. Most of use MS-Excel to deal with tabular data. Many time it happens that we have entered a huge amount of tabular data in Excel. But after getting half of the work completed we realize that it would be better if we have entered the data in row vise or vise-versa. It would be really difficult to change the rows into columns after entering large amount of numerical data. Today at Free Software Advisor you'll learn How to change the numerical data from rows to columns or vise-versa. 
Transpose option is mainly used for this purpose. This options changes rows to columns/ columns to rows. 

USING TRANSPOSE OPTION
I used my own created data for this picture tutorial of using transpose option. 
Now if we wish to change the above two rows into columns: Just select the cells you wish to convert. Copy these cells or Simply press Ctrl+C to copy the selected cells, as shown in the image below.
 Once you copied the cells; right click on the cell you wish to paste your data into rows and click Paste Special (and select the highlighted option in red box) That highlighted option is names as Transpose Option.
Once you selected the Transpose option, the above data shown in columns will be converted to Rows.
 Or if you have done the double click on the Paste Special Option the window similar to the window below will be opened. There click (check) the check box of Transpose.

Your column entered data will be arranged into rows without any trouble, tension and it ust takes a few mouse clicks.