Wednesday, March 31, 2010

Create Chemistry Equations and Diagrams in Ms-Word

Hello Readers:
No Doubt Microsoft Word is the worlds top leading word processesing software, and provides you the most effective and efficient tools for your text formatting. As earlier, on Free Software Advisor platform you learned about 

Today Software Advisor platform brings another especial tool for persons/students/teachers who deal with Chemistry, and prefer Microsoft Word for word processesing. Microsoft Research has recently released a new Ad-in  for word 2007-2010 to deal with chemical formulas and diagrams on the Microsoft Word platform. You easily can convert any Chemical name or formula into its Chemical Diagram, of standard name. You are a student, professor, or a professional chemist, This Chemistry add-in is an effective tool for you. Using this add-in you can easily bring chemistry to your computer. 

Download the Chemistry Add-in from the following link

Chemistry add-in

After downloading Install it on your system.  Run the following ChemistryAddinforWordBeta2.Setup 
After the installation you'll have the Chemistry tab on your Ms-Word ribbon 2010 as shown below.
(this tutorial is based on Ms-Word 2010)
Now Question arises How to use this add-in in Ms-Word?
Using Chemistry Add-in
Using Chemistry add-in is not a big issue, using this add-in you can insert an already created diagram from chemistry gallery to you documents.

You also can convert any chemical name into it equivalent chemical form. All that you need to do is, simply make a right click on the word and select "Convert to Chemistry Zone" and then click on its name. as shown in image below.
Now if you click the Chemistry Navigator button as shown in image below. You'll see the chemical form  in the sidebar. There you can choose to insert diagram into the document. Some of the Chemicals will be automatically converted to the diagram, but some others may be linked to it in the side bar.

You can also convert a chemical name / formula to it equivalent diagram. Here I used Water(H2O) as an example.
First I converted it to Chemistry Zone. If you have written the H2O formula instead of Water, then by clicking on the Convert to Chemistry Zone, it'll automatically be converted to diagram, If its written water, then you'll need to follow the following step.

Once you have completed the step 1. Click on the View button as shown in the image below.
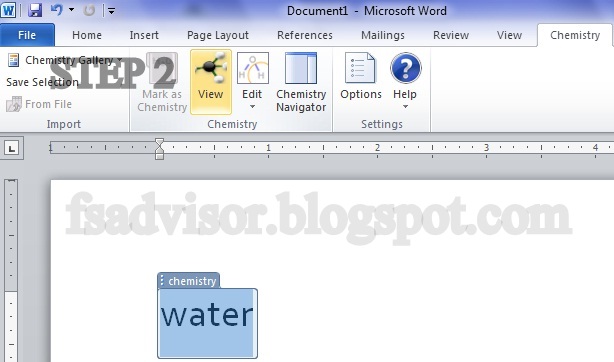


After Clicking on the view button a new popup window will be opened. There you can choose from any of the available representations of Water. For its Diagram you'll have to choose the 2D option, shown at the top of all available options.

Once you selected the 2D option. The word Water will be converted to its equivalent Chemical Diagram as shown in the image below.


Click To Download Chemistry Add-in

Tuesday, March 30, 2010

Decrease Ms-Office Auto Recover Interval

Hello Readers:
Office 2010 is one of the best Word Processesing Suite. It has many features, regarding the privacy of your documents, prevention from data loss and many more...
Auto Recovery is a very known and useful feature of Microsoft Office, with the help of which you can keep your data safe from being lost due to th system crash, power failure. This feature automatically saves a temporary based copy of your document at certain time intervals. By default this time interval is set to be 10 minutes. Which is a long duration. 
Today Free Software Advisor will tell you how you can easily  change the Auto Recovery time interval. This is useful if you are having problems like load shedding, power failure due to any other reason, system crash or any other problem. 
To guide you through the whole process I'll be using Microsoft Word 2010, but the same options tab can be found in all the Microsoft Office Applications:

Just Click on the FILE tab on the left upper corner of MS-Word 2010, or 
Office Button of Ms-Word 2007 and click Word options

File > Options


Click on the save tab shown in the left dialog box, and be sure to check the checkbox of "Save AutoRecover Information" as shown in the image below.
Here you can choose the time interval, how often you want Ms-Word to save a temporary copy of your document. 


My Words: 
Don't Choose too small interval, make it 2 or more minutes. Because with this 1 minute interval while working on the large documents it may slow down your computer. Because while working on the large documents and saving your documents every 1 minute will cost your computer in terms of slow processesing.

You Might Also Like:

Advance Typography in Microsoft Office 2010

Fonts can help your documents stand out and be easier to read, and Office 2010 helps you take your fonts even further with support for OpenType ligatures, stylistic sets, and more.  Here’s a quick look at these new font features in Office 2010.

To use the advance font features in Office Twenty Ten (2010). Open new document and type there some text and follow the steps shown below....

Once you clicked on the font as shown in the image above. Now choose the font named Gabriola as shown in the image below.
Now, Clack on the Advanced tab, to choose from different options in OpenType Features.
You can choose the Ligatures settings as shown below.


At the last Stylistic Sets for you fonts, The drop down button always shows options from 1-20. Mostly fonts include 1 or 2. Gabriola includes up to 7, You can choose 6 or 7.

Once you are done with all of these settings your typed text final face will be like this.
The font ligatures change based on context, so they will automatically change as the text is being typed.  Watch the transition as I typed the word Free Software Advisor in Ms-Word with Gabriola stylistic set 7.


Enjoy!

Let me know if you liked this post. Youe comments are precious for me.

Monday, March 29, 2010

Access Hidden Themes in Windows 7


Windows 7 provides its users with only one location specific theme, based on the selection of language and location during the installation of windows 7. Today Free Software Advisor will tell you a simple and very small technique to access the other hidden location themes of Windows 7.
Approximately all of us specify the English Language, and US as the location during the installation of Windows 7. By this specification windows automatically determines US as your current location and shows the theme of US only.
But here Software Advisor will let you know about "How to access all location specific hidden themes in Windows 7". 


1. Simply open the Explorer (Windows + E) and goto C:\Windows\winsxs
2. Enter *.theme into the search field. If you have problems to type *, use the * sign on the number block.
3. Now it should look like this: Click me!
4. Double-click the themes ZA, US, GB, CA, AU to install them.
5. you have unlocked 5 cool themes.


OR Another Way
To access the other available location specific International themes you need to copy the following code and paste it into Search Box in Windows Start Menu and strike the Enter button.
Or just Select the following code right click and click Goto 


C:\Windows\Globalization\MCT

There in the MCT folder you'll see the all other hidden themes of other regions like Canada, Australia, United Kingdom, United States and South Africa. To Install the any of these available themes open the desired folder and then theme folder.


for example 
C:\Windows\Globalization\MCT\MCT-GB\Theme

or if you only want the wallpapers then
 C:\Windows\Globalization\MCT\MCT-GB\Wallpaper


Sunday, March 28, 2010

How to set Apple iPhone Skins: VLC Media Player 100+ Awesome Skins

Hi Readers:
Customization is the process of change according to your needs.  Today Free Software Advisor will tell you the process " How to Change theme/skin of open source VLC media Player"


I am currently using Apple iPhone skin for VLC Media Player
VLC media player is the mostly used open source media player, which nearly supports all the audio/video formats. Here is a customization tip for all of you. Using this feature you can set any of your favirite skin for VLC media player (Winamp Skin, Windows Media Player Skin, iPod Skin and many more to choose from).
Step : 1
First of all you need to open VLC media player and as shown below, from tool bar click Tools > references
Step : 2
Then click the check box Skins and in
Step : 3 
click VLC skins website as shown in the image below.
Step : 4
In this step yo need to download the zipped folder containing 105 skin files.
Step : 5
After Downloading the skins folder, you'll need to unzip the folder. Or copy all of the skin files to any other folder
Now click Browse to the destination folder and choose your favorite skin to be used on VLC media player
Step : 6
Restart the VLC Media Player and enjoy the theme.
To change the new theme follow the same process: Just with change in step 1:
now you'll need to right click to go to the Preference tab

Convert Audio/Video files with OXELON in any format


Hello Readers:
There are lots of audio/video converters available. Many of them charge you some cost for full version and the rest of them don't allow the HQ conversion and don't have user friendly interface. Today Free Software Advisor brings a new and easy to use tool for the conversion of your favorite audios/videos; OXELON Media Converter. A free and easy to use, user friendly interface containing tool for Audio/Video conversion of you favorite multimedia files.This software also allows the extraction of audio from video files.
This free software has following major features:
1:  It processes many files simultaneously
2:  It converts your multimedia file to many formats
3:  It allows you to extract audio out of the video files
4:  You can resize your video file and allows you to recompress the audio.
and many more......
The most important feature of this software is its assimilation with Windows Explorer. This feature allows you to convert your audio/video files by just right clicking on them (without running the software). If you only want to extract only audio from your video file. All that you need is to just right click on your video file. To extract audio out of video file click on Oxelon - Convert to audio and choose your desired output format of audio file.
There are a lot of Video output formats available within this Free Audio Video Converter (e.g 3GP, ASF, DVD, FLV, MPEG and many more to choose from)

I personally recommend you this software because of its assimilation with the Windows Explorer. This integration makes audio/video conversion very easy and quick. This software is compatible with the Windows XP/7/vista/2000. Once you have downloaded the setup file you'll also have to download the plugins of this software for efficient performance.
Download | OXELON Media Converter

You sholud also checkout the following free tools related to downloading and conversion of audio video files.
Convert Your favorite VIDEOS using Free FLV Converter V6.7.4 
VideoGet+Crack (Download videos from any website in any format)

Free Download WinX HD Video Converter Deluxe "worth $49.95"

Tuesday, March 23, 2010

Facebook Themes: Install Themes to your Facebook Pages

Hello Readers:
Do you want to apply themes to your face book pages? Feeling this difficult?? In comparison to Orkut, Facebook doesn't provide you any option to customize pages. Free Software Advisor introduces you to a useful Facebook application  "CahmeleonTom". Using the Facebook free application ChameleonTom you can easily customize your Facebook pages. This is a free and easy to use application. Using this application you easily can apply themes to your Facebook pages.

How to Install themes to your Facebook Pages.
Download ChameleonTom
Step: 1
Install the downloaded plugin to your system. It only works on Internet Explorer or Firefox. Install the application.
  
Step: 2
After the installation process is finished you will be asked to choose the theme out of the available theme collection of ChameleonTom application.
Step: 3
Once you installed the selected theme: you'll be asked to login to your Facebook Account
Step: 4
you have to allow the application ChameleonTom on your Facebook account.
Step: 5
Thats all: Enjoy the Facebook theme on your account. Checkout mine.....

One Bad News for Google Chrome and other browser users:
This application only works Internet Explorer or Mozilla Firefox

Saturday, March 20, 2010

Lock Google Chrome Tabs: Chrome Lock Extension "block access to chrome tabs via password"


Hi Readers:
Free Software Advisor is a platform where you can have updated information to make you browsing more secure and private. Today I am going to tell you a TIP to make your browsing safe, using this tip you can lock your GOOGLE CHROME BROWSER. This will make sure that your browsed pages might not be closed or altered by someone else, even if you leave your system open for some time.

Many time it happens that while browsing the net we open some important content and on the same time we have to leave our computer for a while. During that time some one else may come and use our computer and closes or changes the pages that we don't want to close. After this we'll have to search in our browser history or our concerned pages. But Free Software Advisor has an appropriate solution for this problem. If you are a Google Chrome user then feel free to leave your computer even if you are doing something important on the net. Google Chrome will not let other to close/browse through your open pages using Chrome Lock extension.
Yes! Chrome Lock extension is a very useful application of Google Chrome Browser.
How To Use This Extension?
Step 1 & 2: 
Step 3:
Step: 4 & 5


Step: 6
Step: 7
Once you have installed this Chrome Lock Extension, you'll have to restart your browser to activate that installed chrome lock extension. Once you restated your browser Repeat the step 1 and 2 
Now you'll see Chrome Lock Extension installed: Click Options
Step: 8
Once you clicked options button: you'll be prompted to enter a security password.
Step: 9
Now press CTRL+SHIFT+L to lock your Google Chrome Page.Once you pressed CTRL+SHIFT+L your page will be restricted from further editing/browsing. Your page will be locked at the position where it is.
Step: 10
Press CTRL+SHIFT+L again to unlock the page. you will be asked to enter the password to unlock. Enter the password that you set in step 8.

Complete System Information: Piriform Speccy

Hi Readers:
Piriform is a platform for free softwares. Piriform creates software for you computers to make them faster, secure and more productive. The piriform created award winnig softwares for you and all of these created softwares are compatible with Microsoft Windows 7. 
Earlier Free Software Advisor brought to you a Free Data Recovery Software, this software efficiently recovers data from the damaged disks and formatted disks.


Today Free Software Advisor brings another free and handy tool for you. This is a light weight and efficient tool for your systems. This software tells you the complete details about your computer system. Piriform Speccy is designed as an electronic sticker containing the complete details about computer system specifications. 
Some of the general informations may be found by just right click on MY-Computer and then properties. But Piriform Speccy is a free software designed to provide you the detailed statistics about every piece of your computer hardware.


This software provides you the complete and detailed information about your system. It gives information about your CPU; The CPU details include

Cores, Threads, Name, Code Name, Package, Technology, Specification, Family, Extended family, Model, 
Extended model, Bus speed, Rated Bus speed, Stock core speed etc...
Click to DOWNLOAD Piriform Speccy